
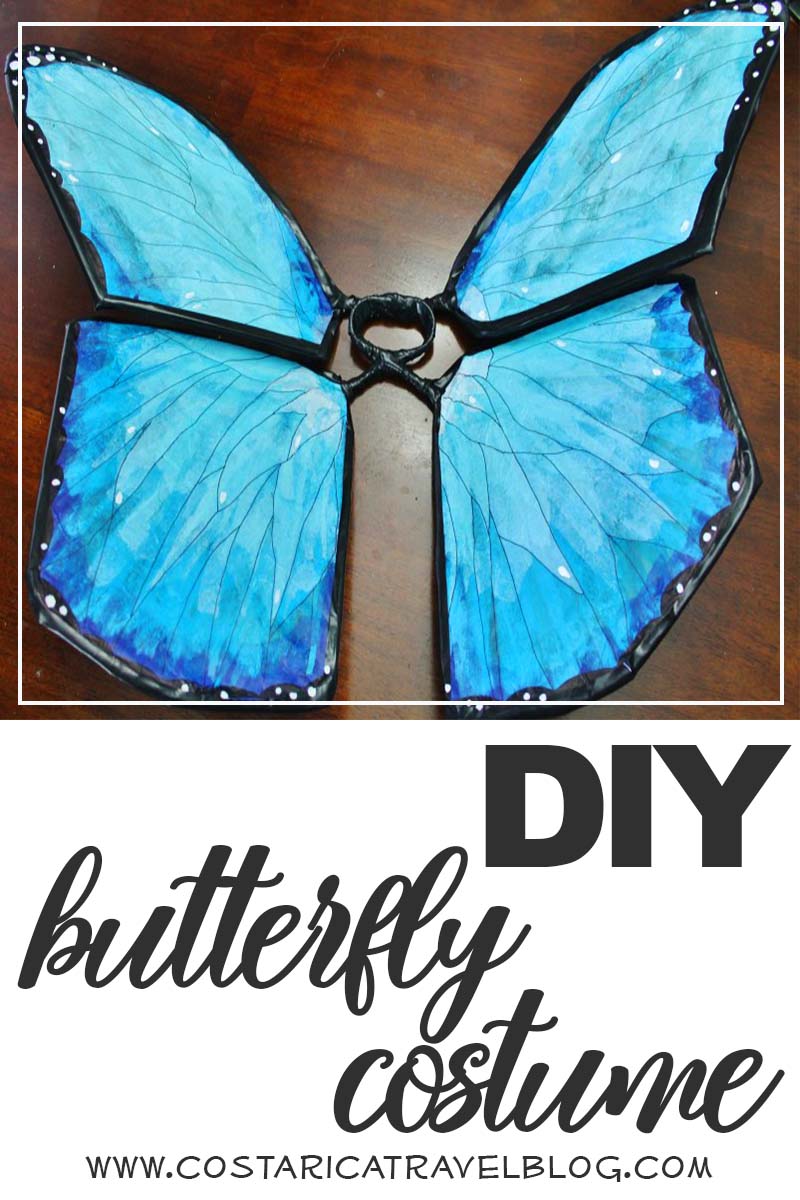
DIY Costa Rica Morpho Butterfly Costume
Article last updated on September 28, 2019. Note that an old date may indicate that an update is not required, not that the text is outdated.

Article written by Nikki Solano
Nikki is the CEO of Pura Vida! eh? Inc. (Costa Rica Discounts), the creator and narrator of Spotify's Costa Rica Podcast with Nikki Solano, and the author of the guidebooks Moon Costa Rica (2019, 2021, 2023, and 2025 editions) and Moon Best of Costa Rica (2022 edition) from Moon Travel Guides. Together with her Costa Rican husband, Ricky, she operates the Costa Rica Travel Blog, created the online community DIY Costa Rica, built the Costa Rica Destination Tool, and designed the Costa Rica Trip Planning 101 E-Course. In addition, Nikki has written about or presented Costa Rica on Rick Steves' Monday Night Travel show and podcast/radio show, in Wanderlust Magazine, and for Essentialist. Want to show your appreciation for her free article below? Thank Nikki here. ❤️️

Get the Costa Rica info you need by browsing our article's TABLE OF CONTENTS:
- HALLOWEEN IN COSTA RICA
- QUICK DIY COSTA RICA MORPHO BUTTERFLY COSTUME ITEM LIST
- STEP #1: DEFINING THE BUTTERFLY WINGS’ SHAPE
- STEP #2: CONSTRUCTING THE BUTTERFLY WINGS
- STEP #3: DECORATING THE BUTTERFLY WINGS
- STEP #4: ADDING FINISHING TOUCHES TO THE BUTTERFLY WINGS
- STEP #5: CONNECTING THE WINGS AND APPLYING THE STRAP
- STEP #6 [OPTIONAL]: CREATING BUTTERFLY ANTENNAE
HALLOWEEN IN COSTA RICA
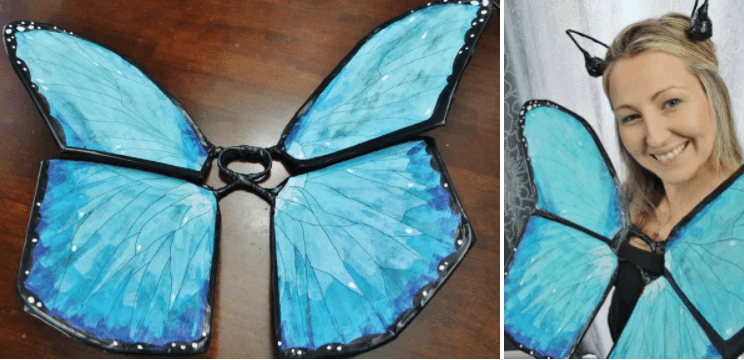
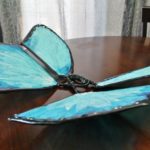
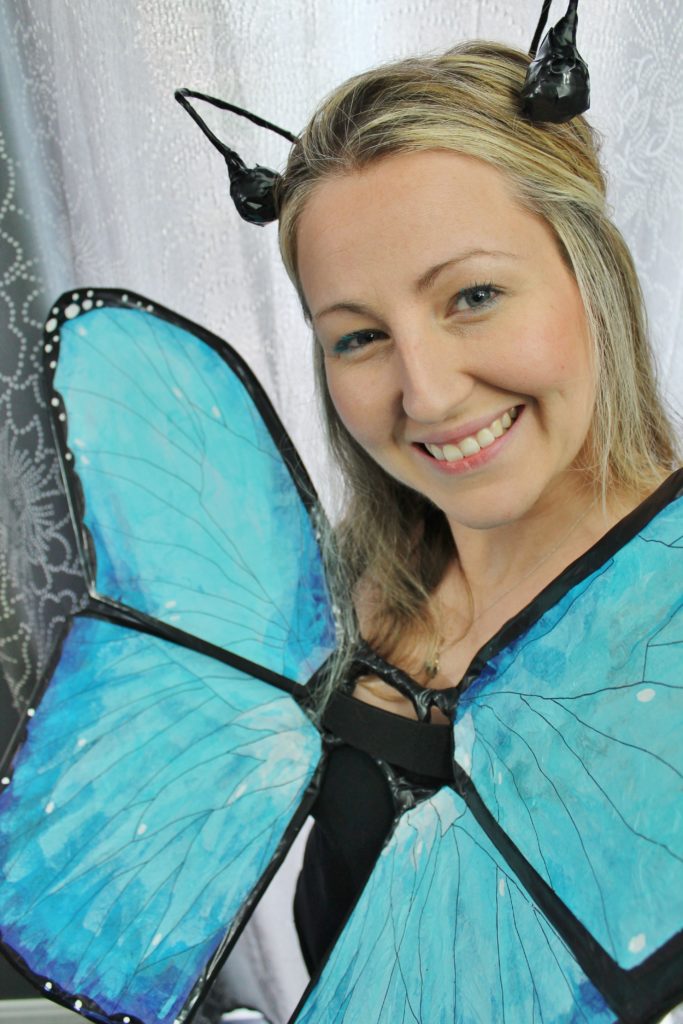
As we explain in our related blog post DIY Costa Rica Three-Toed Sloth Costume, Halloween both is and is not celebrated in Costa Rica. In our household, we embrace is commercially, but we do not celebrate it religiously. In a nutshell, the day is like any other, except for my annual tradition of designing, crafting, and dressing up in a unique Costa-Rica-inspired costume. Last year I transformed into a sloth. This year costume creativity took flight and I opted to morph into a blue morpho butterfly. Fortunately, you can too, with relatively little money, some free time, and a DIY imagination.
QUICK DIY COSTA RICA MORPHO BUTTERFLY COSTUME ITEM LIST

Items required to create the butterfly wings
- 4 metal clothes hangers
- 1 roll of clear cellophane (or similar transparent material, such as a clear drop cloth, tablecloth, shower curtain, or even unmarked plastic grocery bags)
- 4-5 tissue paper sheets consisting of a variety of blue shades (ideally one dark blue shade, one bright blue shade, and one light blue shade), as well as white tissue paper (if desired)
- White liquid craft glue (approximately 2 ounces of glue is needed)
- 2 tbsp water
- 1 medium paintbrush
- Black electrical tape
- 1 fine-tip black marker
- 1 thick-tip black marker
- 1 small paintbrush
- White acrylic craft paint
- 1 velcro strap (large enough to tie around your chest without it falling down)
- Hot glue gun and glue sticks
- Scissors
- Small bowl
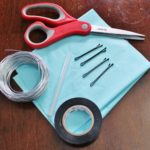
Optional items to create the butterfly antennae
- Wire
- 1 tissue paper sheet (any colour)
- 4 hair pins (a.k.a., bobby pins)
- Hot glue gun and glue stick
- Black electrical tape
- Scissors
STEP #1: DEFINING THE BUTTERFLY WINGS’ SHAPE
For this step you will need:
- 4 metal clothes hangers
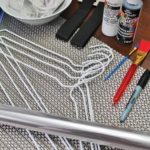
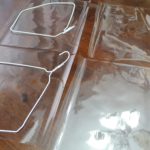
For my wings, I used four white-coated clothes hangers as I had some extras hanging in my closet. If you only have access to plain metal hangers (i.e., uncoated hangers), they will work just as well. In the end, the hangers are covered by black electrical tape, so it does not matter what colour or shape the hangers are in to begin with.
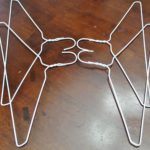
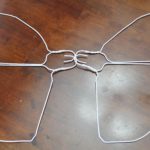
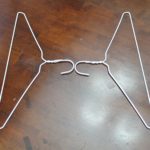
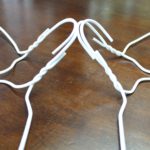
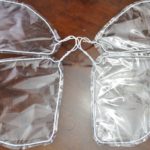
- Start by positioning all four hangers on a table similar to the photo on the left pictured above. Stretch all four hangers into shapes similar to those featured in the photo on the right pictured above.
- Once all four hangers have been stretched into the desirable butterfly wing shapes, bend all four hanger hooks (i.e., the curved portion of the top of each hanger that would normally hang on a closet rack) up toward the sky and away from the table.
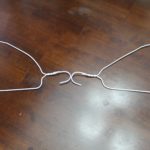
The below photos illustrate how to bend each hanger from its original shape into the desired shape for the bottom half of the butterfly wings (i.e., the hindwings).
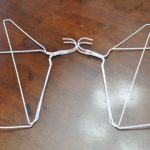
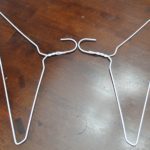
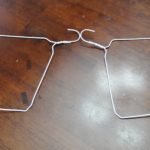
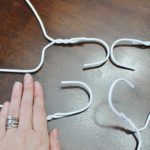
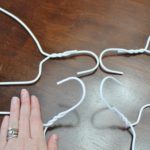
The below photos illustrate how to bend each hanger from its original shape into the desired shape for the top half of the butterfly wings (i.e., the forewings).

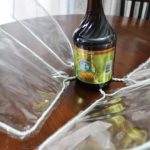
The below photos illustrate how to bend each hanger hook upward and away from the table.
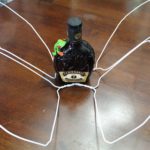
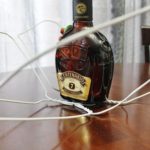
When a heavy weight (such as a Costa Rican Ron Centenario bottle) is placed on top of the bent hanger hooks, the hangers appear to float in mid-air.
STEP #2: CONSTRUCTING THE BUTTERFLY WINGS
For this step you will need:
- The 4 metal clothes hangers you shaped and bent during step #1
- 1 roll of clear cellophane (or similar transparent material, such as a clear drop cloth, tablecloth, shower curtain, or even unmarked plastic grocery bags)
- Scissors
- Hot glue gun and glue sticks
The material you use during this step can vary from a roll of cellophane (what I used) to any other loose material that is transparent (or at least translucent). By choosing to use a material that allows light to pass through it (as opposed to an opaque material, such as cardboard or bristol board), the costume wings will better resemble the delicateness of real butterfly wings.
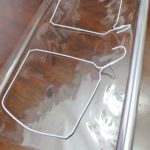
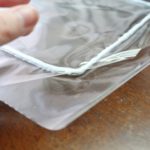
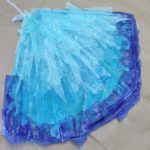
- Lay each of the four hangers on the cellophane. Cut pieces of cellophane that are large enough to cover each hanger piece, providing a 1-2 inch border around the entirety of each hanger’s shape.
- Repeat the above instruction once, so you have two identical pieces of cellophane cut for each of the four hangers. You should have 8 pieces of cut cellophane in total.
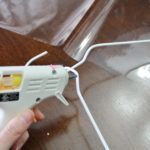
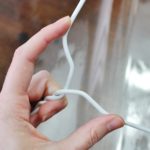
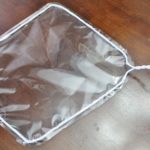
- Using your glue gun, glue a hanger in between its two pieces of cellophane. I did so by laying one piece of cellophane on the table, gluing the edges of the hanger, and placing it onto the cellophane sheet. I then glued the exposed edges of the hanger and placed the other cellophane piece on top. When applying the hot glue to the hanger, do not glue the hanger hook; leave yourself a space of about 1 inch wide on either side of the hanger hook.
- Repeat the above instruction three times, so all four hangers are glued to their corresponding cellophane pieces. The hangers should appear to be sandwiched between two cellophane sheets.
- Once all four hangers have been glued, neatly trim the excess cellophane from the hanger’s edge. Leave yourself a 1/2 inch border around each butterfly wing piece.
The below photos illustrate how to apply the hot glue to the hanger and approximately how much space to leave yourself on either side of the hanger hook.
The below photos illustrate how the hanger will look after it is glued to the first piece of cellophane, how the hanger will look after it is glued to the second piece of cellophane, and how the hanger will appear to be sandwiched between the two cellophane sheets when fully glued.
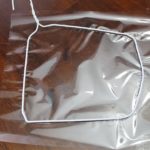

The below photos illustrate how the hanger will look after excess cellophane is trimmed away from the hanger’s border.
STEP #3: DECORATING THE BUTTERFLY WINGS

For this step you will need:
- The 4 metal clothes hangers you added cellophane to during step #2
- 4-5 tissue paper sheets consisting of a variety of blue shades (ideally one dark blue shade, one bright blue shade, and one light blue shade), as well as white tissue paper (if desired)
- White liquid craft glue (approximately 2 ounces of glue is needed)
- 2 tbsp water
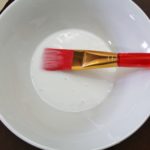
- 1 medium paintbrush
During this step, you’ll need to channel your inner preschooler. Remember paper mache crafts? This next step demonstrates a similar technique, and uses a very basic recipe consisting of glue and water.
- Pour approximately 2 oz. of white liquid craft glue into a bowl. Add approximately 2 tbsp of water to dilute the glue. Mix the two using the medium paintbrush. Set aside.
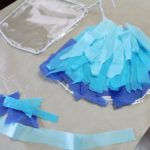
- Crumple up each tissue paper sheet into a small ball and then reopen the ball to form a full sheet again; each sheet should appear rough and no longer smooth. Tear the tissue paper sheets into jagged strips approximately 5 inches long and 1.5 inches wide. The rougher the edges look, the better.
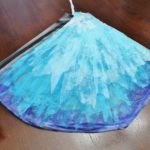
- Roughly position a variety of tissue paper strips on the butterfly wings to get an idea of how you would like to arrange the colours. Don’t spend too much time trying to position each tissue paper strip perfectly as it will change later. Simply play around with the various colours to see which type of design you like best. IMPORTANT: Apply the darkest tissue paper to the outside edges and the lightest tissue paper to the inside of the wings to create a “gradient” colour effect. Always apply lighter tissue paper on top of darker tissue paper.
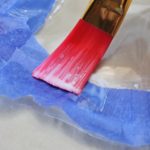
- When you have a colour pattern/plan in mind, remove all tissue paper strips from the butterfly wings. Using the medium paintbrush, apply the glue/water mixture to a section of cellophane on one of the butterfly wings. Immediately afterward, apply enough tissue paper strips to cover the glue. IMPORTANT: Ensure you glue/apply tissue paper strips to the side of the hanger/butterfly wing that allows the hanger hook to bend upward.
- Continue applying glue and tissue paper strips to all sections of cellophane across all four hangers/butterfly wings. Make sure the tissue paper strips extend over all of the hanger/butterfly wing edges so no cellophane can be seen. Once complete, using the medium paintbrush, apply a layer of the glue/water mixture to the top of all tissue paper strips. Do so slowly and carefully; tissue paper strips tear easily. Ensure that each tissue paper strip has enough glue underneath of it to stick to the cellophane, as well as enough glue over top of it to create the effect of a clear coat/glaze.
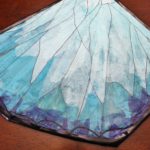
- Leave all four hangers/butterfly wings to dry (ideally overnight). When completely dry, neatly trim the excess tissue paper from each hanger’s edge. Leave yourself a 1/2 inch border around each butterfly wing piece.
The below photos illustrate how to plan for the application of tissue paper strips as well as glue the tissue paper strips to the hangers/butterfly wings.
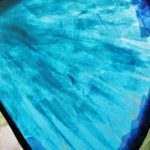
The below photos illustrate how the hangers/butterfly wings will look after all of the tissue paper strips are applied, once the glue is dry, and once all excess tissue paper is trimmed away from each hanger’s border.
STEP #4: ADDING FINISHING TOUCHES TO THE BUTTERFLY WINGS
For this step you will need:
- The 4 metal clothes hangers you added tissue paper strips to during step #3
- Black electrical tape
- 1 fine-tip black marker
- 1 thick-tip black marker
- 1 small paintbrush
- White acrylic craft paint
- Scissors
If you are short on time or supplies, the next few instructions are not required; they do add some key finishing touches take the costume to the next level, however.
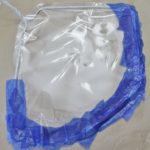
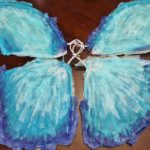
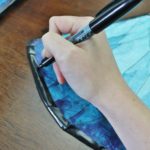
- Apply black electrical tape to the edges of each hanger/butterfly wing. Fold the tape over so half appears along the front edge of the hanger/butterfly wing and the other half appears along the back edge of the hanger/butterfly wing. This will seal the edges and protect the tissue paper/cellophane from rips and tears.
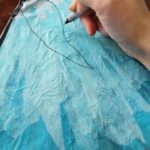
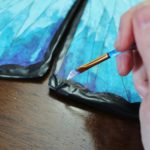
- Using a fine-tip black marker (such as a Sharpie pen), draw random lines in the butterfly wings. Feel free to copy the lines I drew on my butterfly wings for inspiration, or conduct a quick Google search for “Morpho butterfly wings” to access countless photos. When drawing lines onto the butterfly wings, follow the direction of the lines created naturally by the tissue paper strips.
- Using a thick-tip black marker (such as a Sharpie marker), draw half-circle arches around the outer edges of the butterfly wings (do not draw half-circle arches around any borders that represent inside edges). Colour each half-circle arch completely black so it blends with the black electrical tape border.
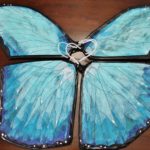
- Using a small paintbrush and white craft paint, apply circles and ovals of various sizes along the top and bottom of the butterfly wings’ black edges. Feel free to apply the paint on top of areas that were coloured in black using the thick-tip marker, as well as on top of the black electrical tape on the wings’ borders. Dabs of white paint may also be applied in random places throughout the butterfly wings on top of the tissue paper (to add dimension to the wings and/or give them a “shine” effect).
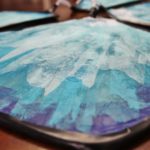
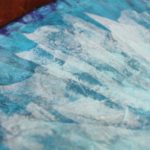
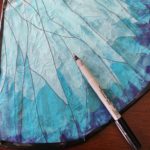
The below photos illustrate the beautiful texture and translucent quality of the dry tissue paper.
The below photos illustrate freehand lines drawn on the butterfly wings.
The below photos illustrate freehand half-circle arches drawn on the butterfly wing’s outer edges.
The below photos illustrate the addition of white dots to the butterfly wings.
STEP #5: CONNECTING THE WINGS AND APPLYING THE STRAP
For this step you will need:
- The 4 metal clothes hangers you added the finishing touches to during step #4
- Black electrical tape
- Scissors
- 1 velcro strap (large enough to tie around your chest without it falling down)
Assuming you wish to wear your costume, this step will help you connect the four hanger pieces and add a strap to make the butterfly wings wearable.
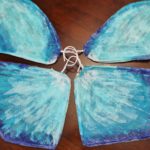
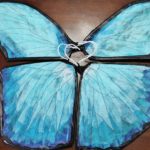
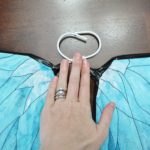
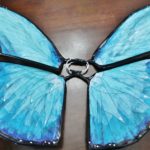
- Start with the hindwings (i.e., the two bottom hangers). Place the two wings on a table so that the two hanger hooks touch and create an oval. Using your fingers to apply pressure, push on the oval so it is flush with the table (this will cause the butterfly wings to lift up from the table). Connect the two hanger hooks together by wrapping black electrical tape around the top and bottom of the oval.
- Repeat the above instructions again for the forewings (i.e., the two top hangers).
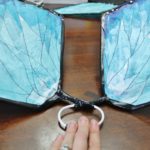
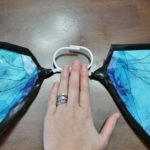
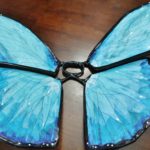
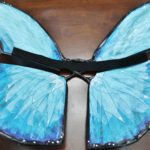
- Place the taped oval created by the forewings on top of the taped oval created by the hindwings. Connect the two ovals together by wrapping black electrical tape around the entire ring (to create one thick oval covered with tape).
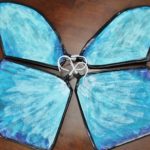
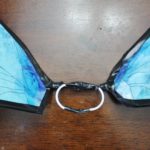
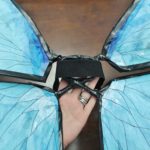
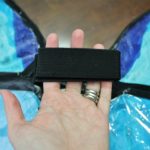
- Lay a velcro strap (or any other tying apparatus, such as a bungee cable, a rope, etc.) across the butterfly wings. On both sides of the taped oval in the center of the costume, feed the strap through to the back of the wings. Flip the costume over and fasten the velcro strap. Later, when the costume is adorned, the velcro strap can be unfastened and wrapped tightly around the wearer’s chest. This will allow the butterfly wings to rest comfortably on the costume wearer’s back.
The below photos illustrate the taping of the oval created by joining together the two forewings.
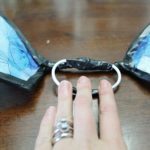
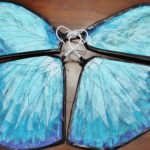
The below photos illustrate what the joined hindwings and joined forewings should look like once taped together.
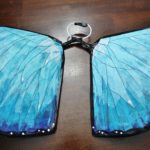
The below photos illustrate how the taped oval created by the forewings is connected to the taped oval created by the hindwings.
The below photos illustrate how the velcro strap is fed from the front of the butterfly wings through to the back of the butterfly wings (to be secured around the costumer wearer’s chest).
STEP #6 [OPTIONAL]: CREATING BUTTERFLY ANTENNAE
For this step you will need:
- Wire
- 1 tissue paper sheet (any colour)
- 4 hair pins (a.k.a., bobby pins)
- Hot glue gun and glue stick
- Black electrical tape
- Scissors
This step is only required if you wish to add butterfly antennae to your costume.
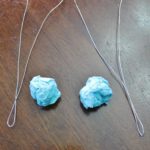
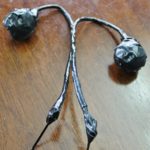
- Cut two pieces of wire, each double the length that you want each antenna to be. For example, if you want each butterfly antenna to be 6 inches long, cut two pieces of wire that are each 12 inches long. Fold the two pieces of wire in half.
- Tear a piece of tissue paper in half. Roll each piece into a small ball so you have two tissue paper balls in total.
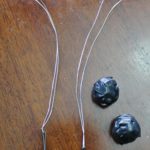
- Using black electrical tape, cover each tissue paper ball in its entirety.
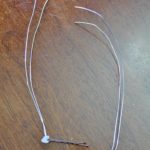
- Thread one of the wires through a hair pin so the fold in the wire rests in the bend of the hair pin. Repeat this instruction for the second wire/hair pin.
- Apply hot glue to the bend of the hair pin to secure the folded wire in place. Be sure to apply a liberal amount of hot glue to all angles of the hair pin.
- Tape each hair pin’s wires together using black electrical tape. Be sure to apply black tape to the bend in the hair pin where the blob of glue is; completely cover the glue, but be cautious not to tape the entire hair pin closed (you will need to be able to open the hair pin later in order to wear it).
- Poke the end of the wires into the tissue paper ball (which will be covered in black electrical tape). Apply additional tape to secure the tissue paper balls to the wire ends.
- To wear the butterfly antennae in your hair, apply the hair pins wherever desired. Use the extra two hair pins (or more, if required) to secure the antennae to your head. Bend the antennae slightly forward for a more natural look.
The below photos illustrate how to bend and secure the wire to the hair pins, how to roll and tape the tissue paper balls, and how to secure everything together using black electrical tape.
Pura vida!

Hey, Costa Rica Travel Blog reader, thank you for visiting and reading our blog! We're truly grateful for your time and preference.
Do you know that your spam-free reading experience is most important to us? Unlike some other Costa Rica blogs, we do not to sell your personal information, and we choose not to display ads, sponsored content, or affiliate marketing on our blog so we can keep your visit as distraction- and junk-free as possible. Because we prioritize your privacy, we don't earn money when you visit us, when you sign up for our e-course, or when you click on our links, which means the time and work we put into this blog—including its 300+ articles—is entirely voluntary! If you find our content valuable, and you'd like to thank us for making the trip-planning process easier and your Costa Rica vacation more enjoyable, please consider making a small donation ($1, $2, $3, or an amount of your choosing) to our blog. Doing so is a great way to pat us on the back if you feel we deserve it. 😊 Pura vida, amigos!

Click on the button above to donate through PayPal. (If you cannot see the PayPal button above, click here.) A PayPal account is not required to make a donation; credit and debit cards are also accepted. PayPal donations are confidential; we never see your payment details.
Love our blog? Check out our other Costa Rica-related projects, too:


Tagged: animals, butterflies, butterfly, costa rica, costa rica travel, costumes, diy, halloween, halloween costumes, travel, wildlife